Before & After: A Low-Budget Kitchen Makeover

I’m excited to share the final before and after photos of our kitchen makeover! It’s been over six months since we completed this kitchen makeover, and since then, we have sold our home and are currently RVing the country.
And now that we’re done with the project and looking back, I can still say it took a LOT of work.
So in this post, I thought it would be fun to share the before photos, progress shots, and the final results of our kitchen makeover on a budget.
Ready to see what it looked like when we purchased it back in 2014?
BEFORE
When we purchased the home back in 2014, it was a mix of bright orange and LOTS of wood… like wood floors, wood ceilings, wood-paneled walls… the works.
When we moved in, we had big ol’ plans for the kitchen, and prematurely ripped out the existing bar with plans for a larger kitchen in the future. Right as that happened, we had unfortunate news related to our sewer lines and had to pay quite a large sum of money to get things fixed.
That’s when our plans slowed down… and instead of doing any type of kitchen remodel, our kitchen was in disarray for many years.
Along the way, I changed minimal things to make the kitchen feel more livable. I painted the cabinets and installed peel-and-stick marble countertops to cover that awful orange. I also gave it a fresh coat of white paint and painted the lowers black and also decluttered everything I could.
We lived with it like this for about 5 years, and things were constantly breaking on us. The only way you could open the dishwasher was by grabbing the sides with both hands and pulling super hard. The exhaust fan for the stovetop broke, and we felt like there was NO storage.


Fast forward five years and we were certain that we wanted to sell.
A couple of months later, we hired a real estate agent and had contractors working on other projects in the house to get it ready to sell.
And that’s where it all started…
We replaced the awful laminate tile floors in the kitchen, and from there it was a downhill spiral.
We were saying to ourselves, “Well, if we are going to rip that out, we might as well get new countertops and who wants these nasty cabinets with new floors and countertops?”
And so on, and so forth. Can you relate?
We had all these great ideas, but in reality, if we were going to sell, we needed to do it ASAP while also saving as much money as possible.
No big deal, right?
So I whipped up some design plans for the kitchen and calculated a couple of scenarios.


We had a bunch of unfinished projects around the house and it was a mishmash of style when we started. Some parts of the house were original, and some parts of the house looked more modern, so it was a lot of work to figure out how I could combine the two different vibes.
The house had green tile in the entryway and around the fireplace, so I knew some type of green-colored cabinetry would be beautiful. Since we weren’t able to rip out the existing cabinetry and start fresh, we bought new drawer and door fronts to make it look like a brand new kitchen.
Next was the countertops…
I needed something super inexpensive, so I knew quartz, marble, and granite were out of the question.
We settled on a laminate countertop that looked like a butcher block countertop. The colors matched up with the existing wood floors and other accents perfectly. It wasn’t my first choice, but it ended up looking awesome!
Ready to see what it looked like when we finished it?!
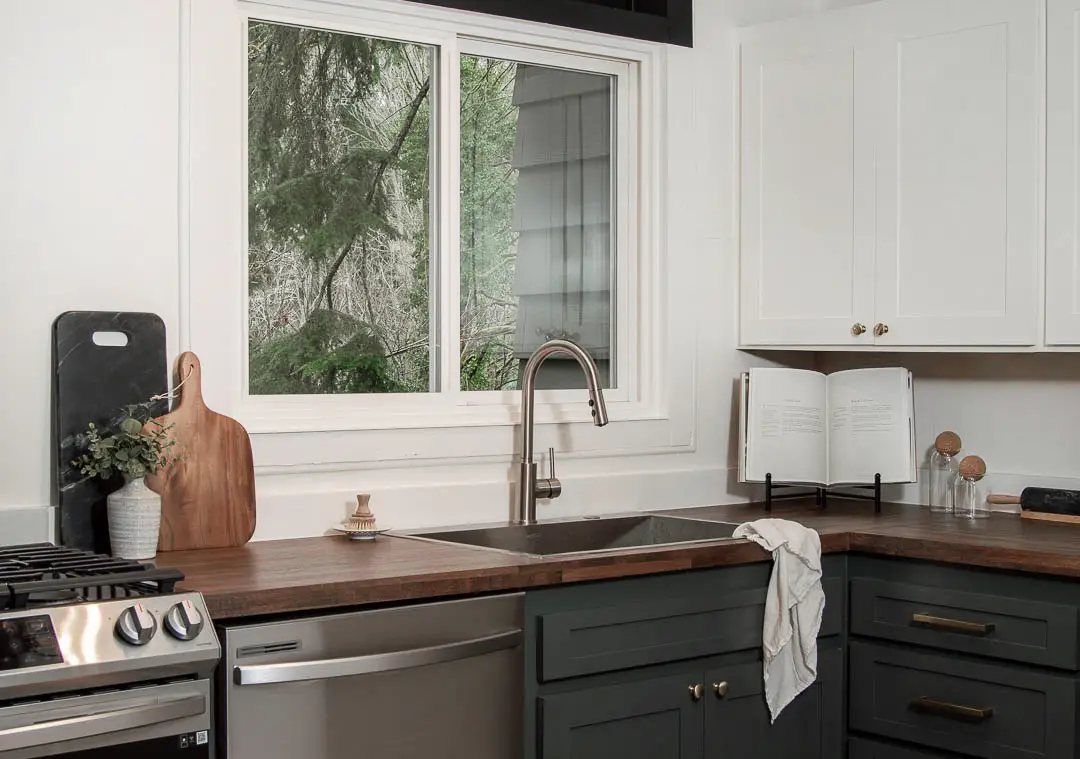
AFTER


After a ton of hard work for about two months straight, we finally finished everything!
The green cabinetry ended up being a flawless color and made the house feel like it was always supposed to be a blend of the original home mixed with a modern vibe.
One of my favorite features of the kitchen remodel was putting the bar back in.
Not only did it provide more counter space for cooking and entertaining, but it also made it feel so much more inviting.


There you have it, the before and after photos of our kitchen makeover!
In hindsight, I wish we would have finished this years ago. It would have been great to enjoy the kitchen for a little longer before we sold the house, but now that we’re out of there, it feels SO GOOD.
If you’re interested in seeing more about our budget, cost breakdown, and what was involved with each step, I’ll have that post up later this week!
Until then,
cheers!