DIY: A Modern Feature Fountain From A Planter Box

You know I’m a sucker for a good DIY project, and this modern feature fountain might take the cake!
A few weeks ago, I had the pleasure of working with AllModern to help turn our new patio into an outdoor oasis, and I ended up making a modern fountain out of a planter box!
And as promised, I’m here to break down all the details so you can DIY your own feature fountain, too!

When we were working on making over our side-yard, we needed something that was visually interesting, other than more plants, and that’s when I came up with the idea to make a fountain.
But not your normal ol’ garden fountain. A sleek and sexy one. You know, like the ones at Restoration Hardware? Ugh, I just love them sooo much!
I had already been pinning so many modern landscaping ideas as inspiration, so I knew a fountain was the right choice. So chic, right?!
But with a price tag of $1100 , *cough* that wasn’t about to happen…
That’s when I saw the big steel planter boxes from AllModern– and I immediately came up with a game plan to make my own.

I followed just a normal garden fountain tutorial on Youtube and sort-of modified it to make my own version.
I’ll break down each step and my plan of attack in way more detail, but in short, this is how I made it–
How to make a modern feature fountain from a planter box-
- Come up with a plan & draw it out
- Gather all the materials and tools
- Test out your fountain pump.
- Make a hole in the planter (if necessary)
- J-B Weld the fountain pump to the planter so the cord exits through the hole.
- Make sure your planter is thoroughly sealed and water-tight.
- Drill a hole in the middle of a piece of sheet metal.
- Paint the sheet metal.
- Drill a hole in a piece of acrylic- smaller than the sheet metal.
- Modify a plastic bucket to fit the tubing and brass pipe.
- Put the planter box in place.
- Attach the vinyl tubing to the fountain pump.
- Place a cinder block in each corner.
- Fill with water and do another dry run to test the pump.
- Cut hardware cloth to the size of the planter and carefully place it on top of all the cinder blocks.
- Cut a piece of mesh about 6″ larger than the hardware cloth.
- Lay the mesh on top of the hardware cloth and duct tape on the sides.
- Place a square paver in the middle, resting on the cinder blocks.
- Level it out with shims.
- Insert a 90 degree brass elbow into the tube and secure with another hose clamp
- Attach a threaded pipe, coupling and another threaded pipe.
- Carefully thread the end of the pipe through the bucket where you drilled a hole.
- Lay on the acrylic sheet and thread on the sheet metal to secure.
- Carefully drop the bucket (with the sheet metal and acrylic) onto the square paver.
- Maneuver to make straight.
- Turn it on and test it out!
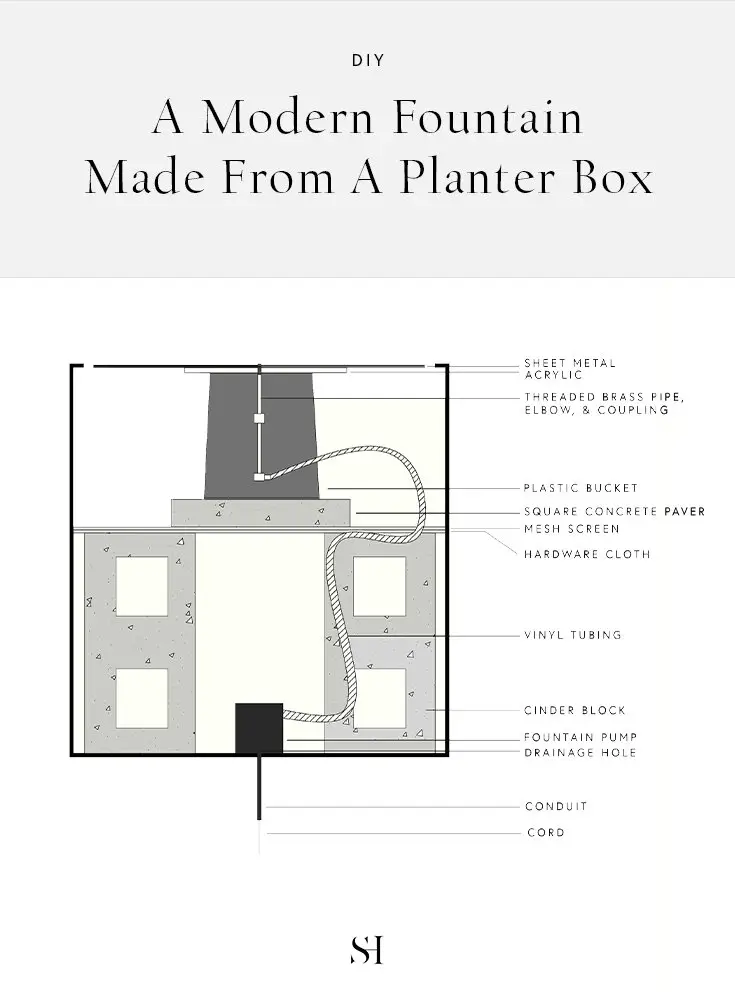
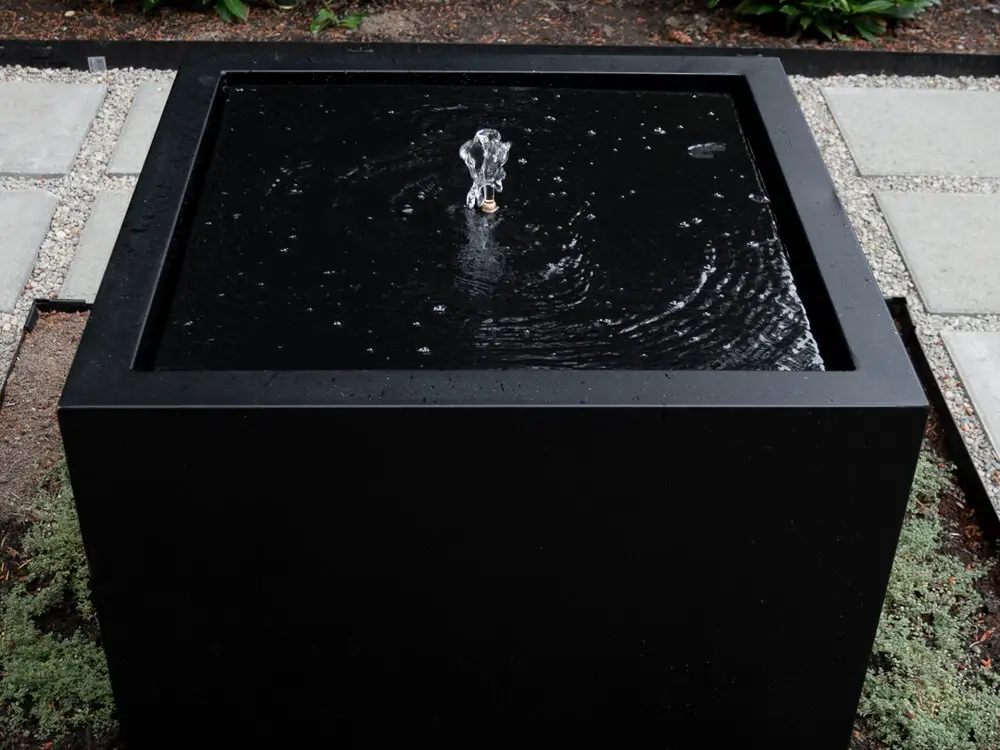
THE PLAN
Making a Modern Feature Fountain from a Planter Box:
The cinder blocks at the bottom are supporting a larger square paver. On top of that paver is a plastic bucket. The bucket will be modified so the tube and pipe fit inside without resistance.
One end of the tube will connect to the fountain pump, and the other will connect to a brass pipe configuration. The end of the threaded brass pipe will stick out of the bucket, which will pop through the center of the acrylic and sheet metal.
A layer of mesh and hardware cloth will be placed under the square paver which will block pine needles and leaves from getting in and clogging the pump.
THE MATERIALS
What you need to Build A Modern Feature Fountain:
- Steel Planter Box- 28” x 27” x 27” via AllModern
- Sheet Metal – 24×24 – A local metal supply company
- Fountain Pump via Harbor Freight
- Hardware CLoth via Lowes
- Window Screen via Home Depot
- Shims via Home Depot
- 2 Gallon Bucket via Lowes
- 8 x 8 x 16 Concrete Cinder Blocks via Home Depot
- 16 x 16 Square Paver via Home Depot
- Piece of Acrylic via Lowes
- 1/4 in. I.D. x 3/8 in. Clear Vinyl Tubing via Home Depot
- Hose clamp via Home Depot
- 1/4 in. x 4 in. Brass Fitting via Home Depot
- 1/4 in. MIP x 1/4 in.90-Degree Brass Street Elbow via Home Depot
- 1/4 in. MIP x 1/4 in. FIP Brass Coupling via Home Depot
- Conduit via Home Depot
- Drill via Home Depot
- JB Weld Steel Stik via Home Depot
- Flex Seal Spray via Home Depot
- Matte black spray Paint via Lowes
- Wire cutters via Lowes
- Duct tape via Lowes

THE FIRST STEPS
Before You Can Assemble The Fountain:
Do a test run
Since the fountain pump will be permanently attached to the planter box, you gotta make sure it works, or else there’s no going back! Test it out in a bucket or another planter that’s already water-tight. Also, make sure all your materials work in your planter. There’s nothing worse than getting 75% there and realizing you need something else.
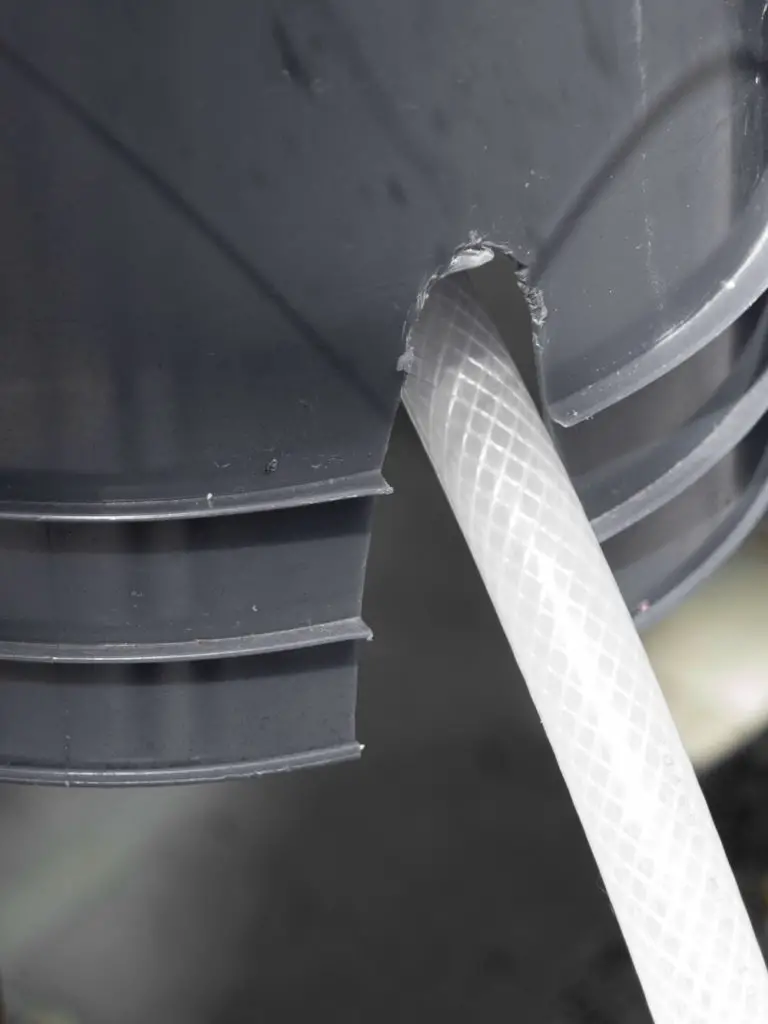
Make a hole in the planter (if necessary)
Most planters will come with a drain hole, but if yours doesn’t have one, you’ll need to make one. This is where the cord of the pump will pass through. I lucked out because the planter box I picked up from AllModern already had a hole, so the cord passed through just fine.


Seal up the hole
Decide where you’re going to place the fountain pump. A corner spot is easy to access once everything’s built, but depending on how you set yours up, that might not be an option. In my case, since I have cinder blocks in the corners, we placed our fountain pump in the middle. Once you have the fountain pump in place, use J-B Weld to form a seal between the hole and the cord, making it water tight. We used the J-B Weld Steel Stik as it adheres to metal and is made to get wet. We did an extra layer of spray flex seal, just for good measure. We want this thing to be watertight!
Make sure your planter is thoroughly sealed
The planter I got from AllModern already came perfectly water tight, so I didn’t need to worry about this. But if your planter isn’t water-tight…meaning you can see sunlight beaming through small cracks or holes, you’ll also need to patch these up. J-B Weld or Flex Seal are great options for this.
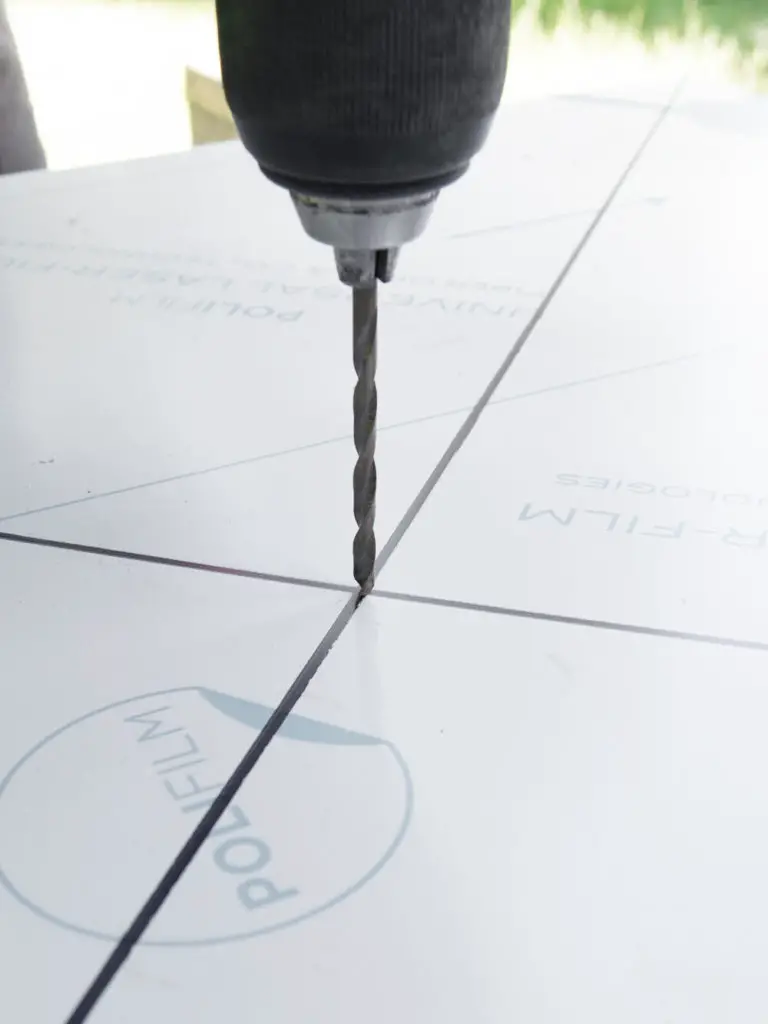

Drill a hole in the sheet metal
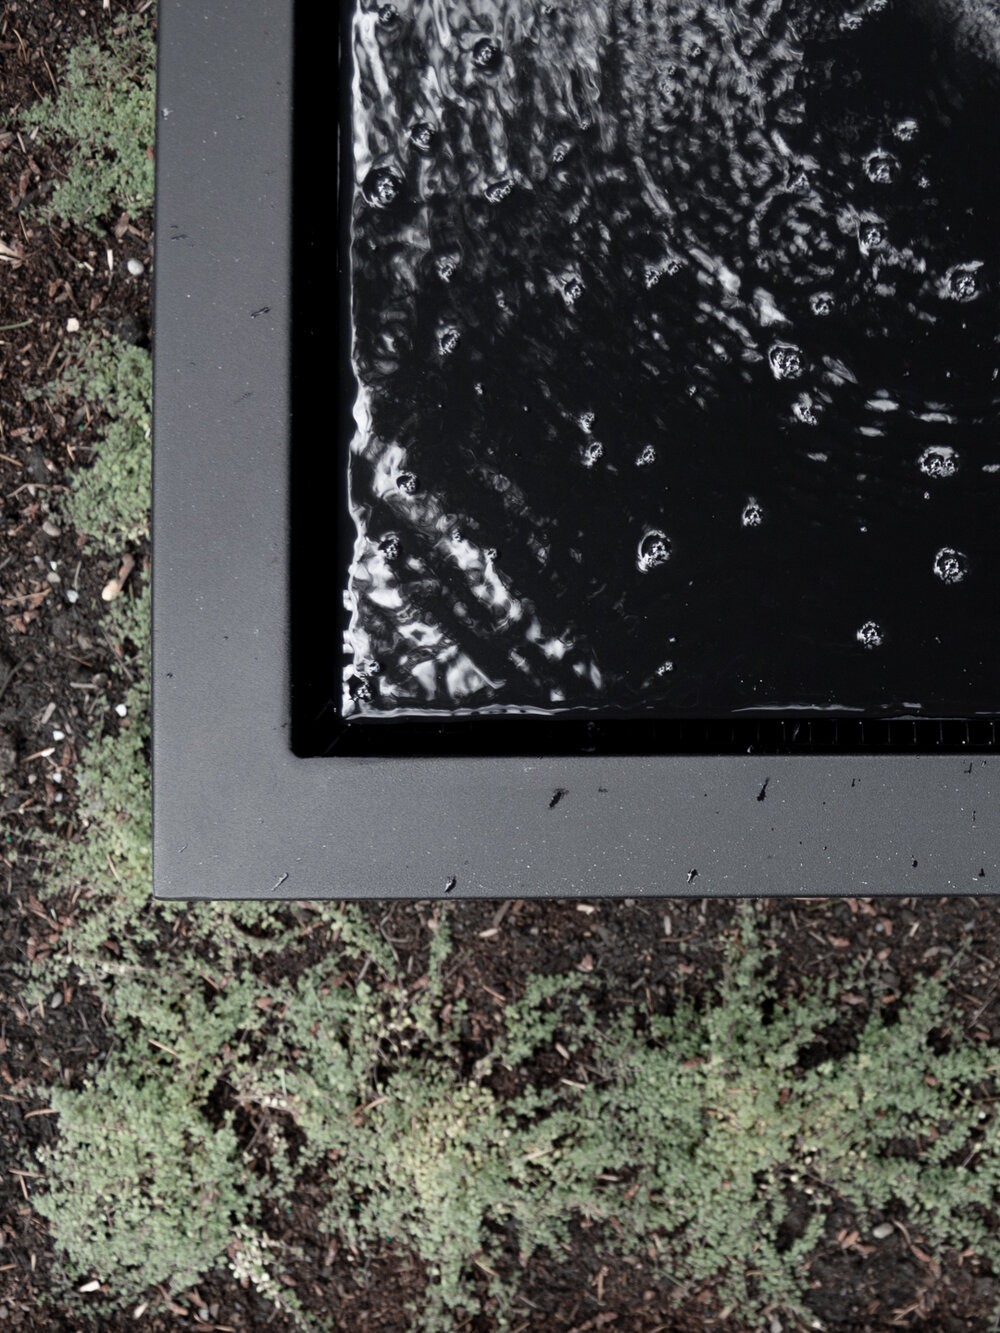
I ended up calling around and found a local metal company not too far from me. They kindly cut me a stainless steel sheet of metal to the extract size I needed for about $32. I had them cut it to 22”, so it would give about .75” of clearance on all sides of the fountain.
One important thing to note is that I picked stainless steel so it won’t rust… this is a non-negotiable since it’s going to be a fountain!
Once you have your sheet metal, you’ll need to drill a hole in the center. The steel company wanted almost $100 to drill a darn hole in it (!!), so I decided I could figure that out myself…and I did just that. Jacob drilled a hole using our handheld drill and a 15/32” bit and it worked perfectly.


Paint the sheet metal
Originally we were just going to spray paint it by ourselves, and I don’t see anything wrong with this route. Instead, we took it to a local body shop and have them paint it for us. Just to be clear, Jacob used to work in the industry so we had a couple of connections…but it’s something to think about if that’s the route you want to go! And if you have the patience to call around and don’t mind sounding like a weirdo requesting something out of the ordinary, do it! Because honestly, It looks flawless….
Drill a hole in a piece of acrylic
Our sheet metal had a slight flex to it, so in order for it to sit completely flat, I needed another flat surface. I had a piece of acrylic on hand, so we used that and I drilled the same size hole directly in the middle of it.
In hindsight – I would have opted for a thicker gauge of metal to ensure there’s no flex, that way there would be no need for the acrylic. But you know… that’s just how DIY goes!

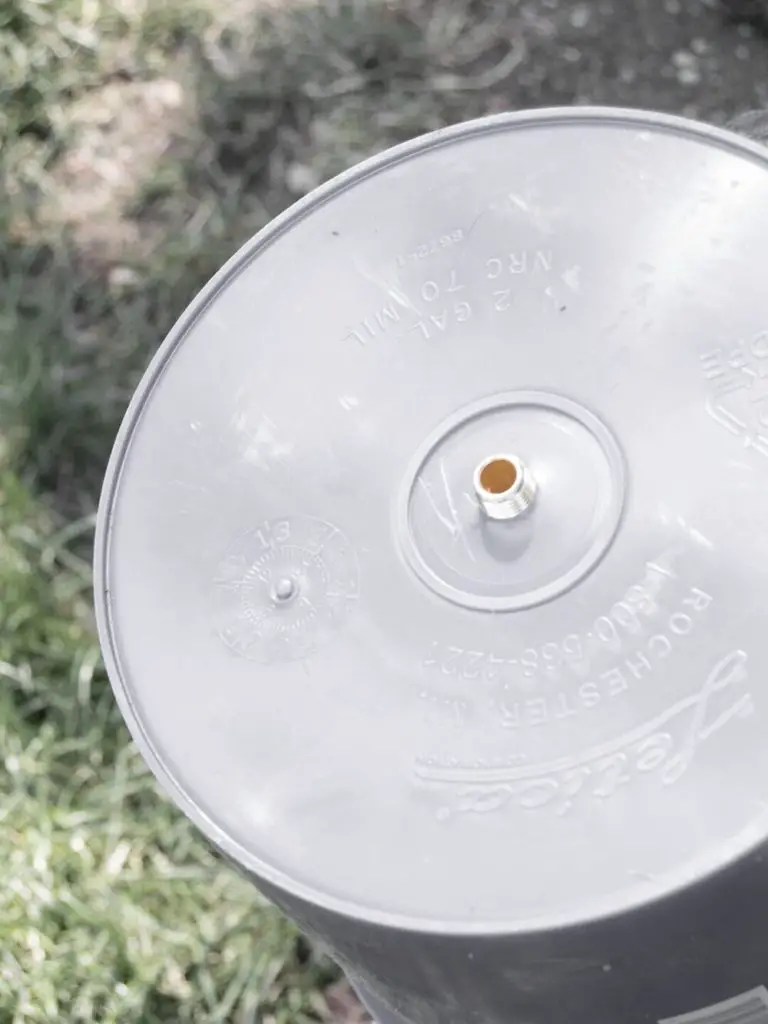

Modify the bucket to fit the tubing and brass pipe.
We need two holes- one at the top for the brass pipe to stick out of, and another at the bottom to feed the tube though. The tube will attach to the fountain pump and at the other end, have the brass pipe sticking out.
Optional – J-B Weld some prongs to the corners.
Before we cut the acrylic and knew that it would help flatten the metal, we tired J-B Weld some prongs in the corners as supports. We ended up taking these off because the acrylic worked perfectly, but I wanted to make sure I mentioned this. It doesn’t have as sleek of an appearance, but nonetheless, it could totally work.


PUT IT ALL TOGETHER
How to Assemble a Modern Feature Fountain
Put the fountain in its final place
We ended up burying ours a couple of inches below ground and then added a small border around it with black edging and some ground covering. Don’t forget to make sure your planer is completely level, too.

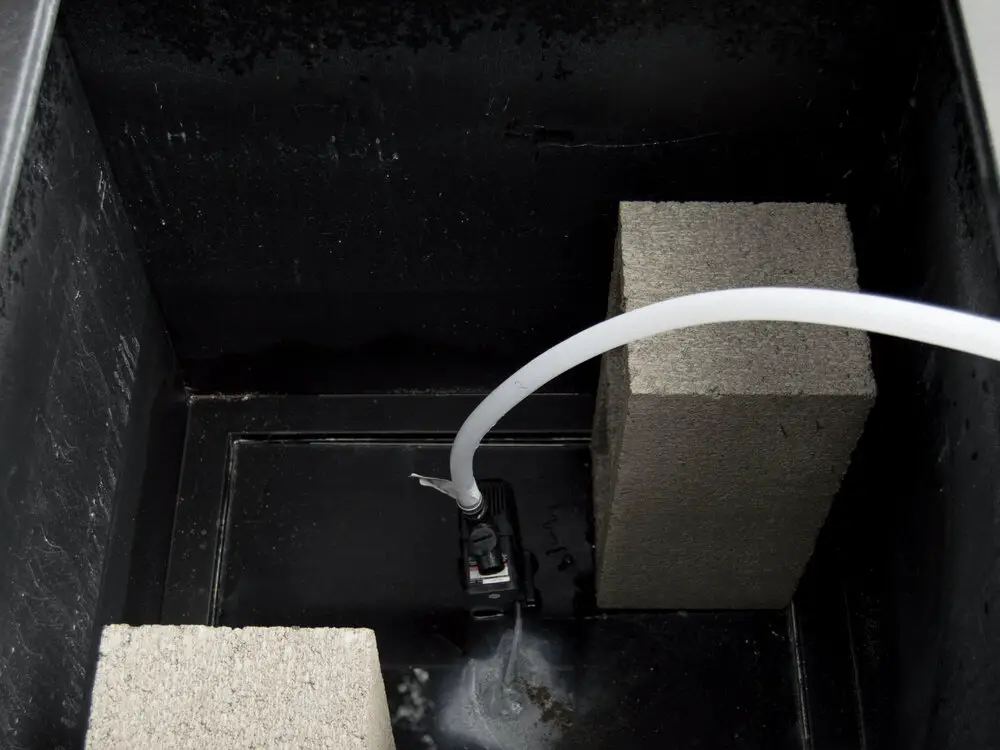


Place cinder blocks in each corner.
We used four 8x8x16 cinder blocks and placed them vertically in all four corners.
Fill the planter box with water and do a dry run.
We did a lot of dry runs to test everything along the way, just to make sure everything was still working. After installing the vinyl tubing, we wanted to make sure the connection was good once the water was flowing through it, and we also needed to figure out the water pressure situation.
The fountain pump we purchased has a valve so you can control the flow of water. So to get the flow just right, you might need to mess with this a bit. Once everything’s working smoothly, it’s time to finish it up!


Put a layer of hardware cloth down.
Cut some hardware cloth to the size of the interior dimensions, and carefully place it in the planter, on top of all the cinder blocks, making sure you pull the tube through.
If you’re using a black steel planter box as I did, be careful not to scratch the metal!
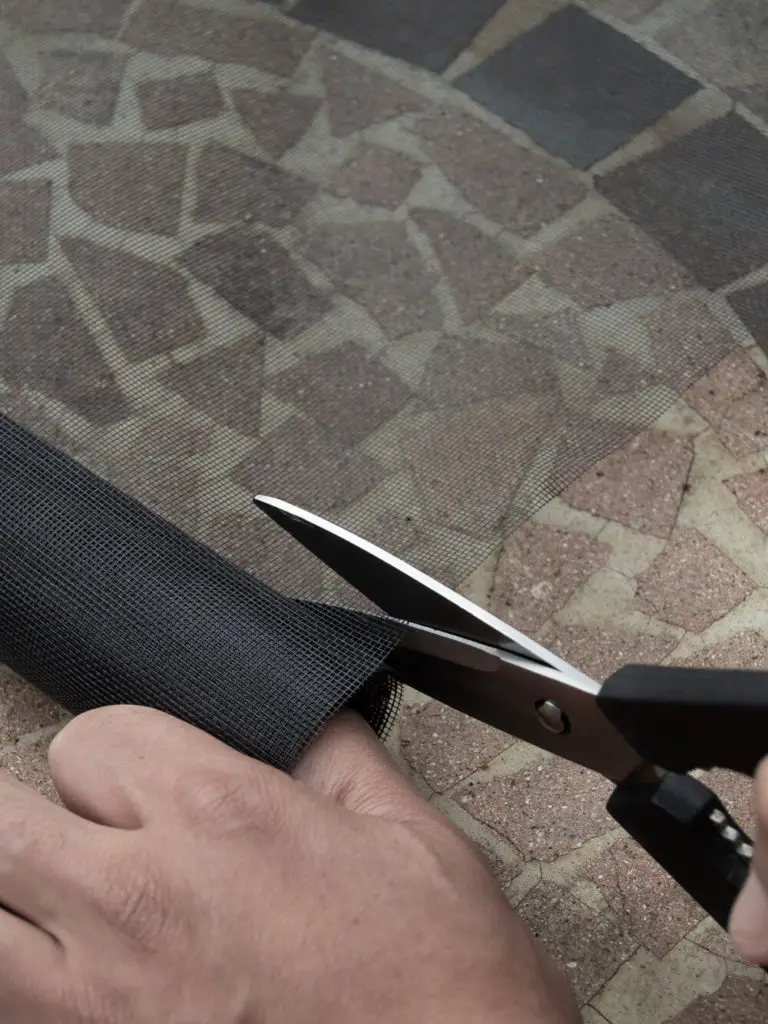

Put a layer of screen mesh down
Next cut a piece of screen that’s about 6” bigger than the hardware cloth you just cut. Then place it on top of the hardware cloth.
We ended up using some weatherproof duct tape to tape the mesh screen to the inside of the planter. The goal is for this screen to catch all the debris and leaves, so they won’t clog the pump, and duct tape gave us a complete seal around the perimeter.
Just don’t forget to leave a little pouch open for the tube to stick through- you’ll be messing with the tube in a bit, so don’t tape it down…you’ll want some wiggle room.

Place a square paver on top of the cinder blocks.
I used a 12×12 square paver block, and simply rested it on the cinder blocks, in the center of the planter. Simplest step of them yet!
Level the square paver with shims.
Next, level the square paver with some shims. Don’t skip this step! In order for the sheet metal to sit completely level, we need to start with a level foundation. Mess around with it until it’s as level as possible. You might even need to readjust once the metal is on, so be patient with this process.


Attach the pipe to the tube.
We inserted a 90-degree brass elbow into the tubing, securing it with a hose clamp. Next, we threaded in a 1/4” x 4” brass pipe, then a coupling and another 4” brass pipe. You can find these in the irrigation section at your hardware store.
Next, stick that pipe through the bucket.


Place the acrylic on top of the bucket.
The hole you drilled should make it so it sits perfectly on top of the bucket. Try threading it on if it’s a tight fit.
Place the sheet metal on top of the acrylic.
The hole in our sheet metal was just big enough, so it threaded onto the pipe perfectly. So much so that we were table to pick it up by the metal once it was on.
Just a heads up- this is a two-person job! Grab a partner so one person can hold the bucket while the other person spins the metal on. It’s important the metal stays flat and doesn’t thread onto the pipe sideways.
We also ended up buying a second coupling so we could thread it on the top and lift it up a bit easier without disrupting the metal.
Set the bucket on the square paver.
Now that the metal and acrylic are on top of the bucket and the pipe is sticking out, carefully place the bucket on the square paver. It’s important not to have too much tension on the tubing as it rests. Make sure it’s fully relaxed, allowing the bucket to easily sit in the middle of the paver without the tube pushing it somewhere.
You might need to cut into the bucket some more, or mess around with the tube if you have issues.
Make adjustments, as necessary.
As I mentioned, you might need to make some slight adjustments to get everything to sit level. You might be taking everything out to re-level the square paver or the bottom cinder blocks. It’s trial and error here, but here are a few tips that helped me-

Fountain Troubleshooting Tips:
- Mess with the shims- under the square paver, and even under the cinder blocks, if necessary.
- Twist the piece of metal on the pipe a couple of times. As I mentioned, the hole we made in the metal was perfectly snug, so our metal actually threaded on. If yours isn’t a super snug fit, you might need to make sure it’s watertight from the bottom side, whether that’s with some more jb weld, or getting a nut to thread onto the top of the pipe, tightening the metal down.
- Let it run for a bit. We had to wait for a few minutes in order for the water to run to all four sides. If the water isn’t drastically running to one side, just wait it out a bit.
- Our nice neighbor suggested that we wash the metal with some soapy water to get rid of any surface tension. If you find that the water is flowing everywhere but in a few random spots, try to wash it. Oil and water don’t mix well, so if there’s any oil sitting on the surface, the water will flow around that spot.
Ok….. So what do you think about this DIY feature fountain?!
Can you believe it’s just made from a planter pot and a few random things at the hardware store?
I think the final cost probably was around $400 or so. The most expensive thing was the planter, but that’s because it’s massive! Actually a few inches larger than the Restoration Hardware fountain I was using as inspiration. So about 1/3 of the cost! I’m pretty happy about that!
I love the fact that this project can be customized based on the planter you use. You could do this on a way smaller scale or go huge! So cool, right?!
Now that we have a fountain, I honestly can’t imagine our patio without one! It’s not something I ever planned to have, but dang… I think a fountain is a MUST in any garden now! It’s so pleasant to listen to!
I hope this post inspires you to do something unique on your patio or in your garden area this summer!
Until next time,
Cheers!
What did you plant where the fountain is? Moss?
it’s called Breckland thyme
I want the water to flow over the sides, so I will put a capture basin underneath. If I make the stainless steel sheet slightly tighter to the edge do you think I can achieve this effect? I don’t think I can get it 100% with no gap.
Thanks
I don’t even think you’d need the steel sheet on the top… you just need to fill the planter completely with water. Just beware of the type of planter you use, as you’ll get hard water stains easily, so a glazed plater would work better. You might find this video helpful- https://www.youtube.com/watch?v=VvnHZwukk5I
Thanks for the information
Hello, do you have to winterize your fountain and if yes, how do you remove the pump to bring inside?
Hi! I really love the look of this fountain. I am thinking of making one similar. I’m thinking of just using a solar fountain though. It seems like you could skip a lot of the steps and shave off a lot of the cost. I have a solar fountain already that came with a bird bath I bought. However, since the bird bath doesn’t hold a lot of water, I found I have to refill it every day due to the spillage, even when I change the tips to reduce the spray. My question is this, what idea can you suggest to use use to hold it in place so it stays in the center of the square planter? I removed the simple Styrofoam ring underneath it and used rocks to surround it to keep it in the middle of my bird bath but it still just isn’t enough water to make it worth the pain of daily maintenance so I want to make a deeper well of water like your fountain’s size. Any suggestions on what I could use? I’ve thought about cutting a piece of PVC to the right height, painting it black so it’s not seen really, and gluing the base to the bottom of the planter then affixing the solar fountain to the top so it stays in the center. I’d have the entire volume of the planter for water so I figure it’d last quite some time before I had to refill it to compensate from water loss. I’m hoping to hear an even better idea from you. 🙂 Yours certainly is gorgeous! I just don’t have the money you spent to make it lol. Thank you either way!
-Mary