How to Make a Modern Patio with Pavers & Pea Gravel

Earlier this spring, my fiance and I tackled our biggest DIY to date, and that was making a modern patio!
We had been itching to do something with our awkward side-yard for quite some time, so we came up with a plan and transformed it into a useable patio complete with a feature fountain! You can read more about my plan in this post.
If you’ve ever wondered how to make a modern patio with square pavers and pea gravel, keep on reading because I’m going to share with you exactly how we made ours, and everything we wish we would have done differently!


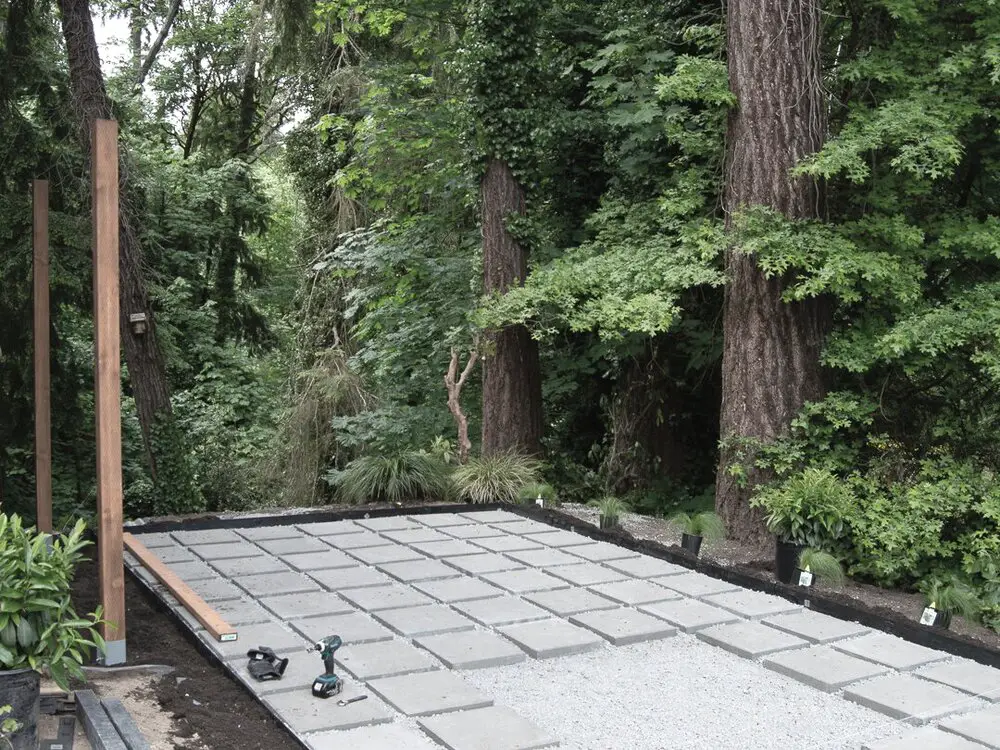
Ok, so as you can see, we’re working with a weird spot here-
It’s a pretty large area on the side of our house, and to be honest, we haven’t done a thing with it since we moved in. Since this spot is basically the only spot on our property that gets a fair amount of sunshine, we wanted to make sure it was functional for a couple of things-
One was a spot for a raised garden, and another was a spot to hang out. Our chihuahua, Bella, loves to lay out in the sunshine, so having a patio area close by where she can be was also important. She loves to venture out in the cul-de-sac to score that prime spot in the sun.
So with those things in mind, I created a plan of action and mocked it up a couple of times.


The first rendition was just a basic rectangular patio with a slim walkway, but after we got started on this project, I knew I wanted to add to it. If you’re interested, you can see the original plan here.
In the new plan, I added to the patio and made it a little bigger, and then added some more architectural elements that helped make it feel less random, like a pergola and some concrete walls.
I’m hoping to go into more detail about this plan next spring when we add to it, but for now, let’s get into how we made the patio and all the tools and materials we used-
Materials & Tools Needed for A Paver & Gravel Patio


STEP 1
Establish a level line & start digging
Once we had a plan of action and had some measurements, first we established how deep we needed to dig. This was super important because of how sloped our yard was.
Using some plastic steaks, we hammered them into the ground on all the corners to make the outline of our patio space. Then we attached a string to all the steaks to create a string box. After placing the line level on the string, we moved the string up and down on all the steaks until it was level.
This basically shows how much we needed to dig in order to create a level ground. Once we established that, we started digging.
Once we got to the main patio area, we actually didn’t need to dig as much as we needed to fill in more dirt because of the drastic slope. So we had about six more yards of dirt delivered and we filled it in as much as possible.
STEP 2
Level & Compact The Dirt
Little by little, as we added in dirt, we started compacting it with a dirt tamper.
In hindsight, I wish we just rented a compactor, but we didn’t know that we were going to have to add as much dirt as we needed to, to make it level!
Another problem we ran into was the weather. In typical Seattle fashion, it kept on raining during our project, which wasn’t really a problem until we started compacting the dirt.
The dirt was getting too wet to pack down. It would just get stuck on the bottom of the tamper, collecting more mud with each pound to the ground and ended up a muddy mess.
Slowly but surely, we packed and tampered down thin layers of dirt and then took a 2×4 and slowly screeded the dirt to make sure it was as level as possible
STEP 3
Lay Down the Weed Barrier
We laid out some landscaping fabric, also known as weed barrier cloth to prevent any pesky weeds coming through.
We bought two different types of weed barrier for this project, an inexpensive one and a higher quality one, and dang… just if you were curious, there IS a difference. The professional grade weed barrier that was slightly more experience was so much thicker than the cheap stuff.
Long story short, spend the extra couple of bucks and splurge on the good weed barrier fabric!


STEP 4
Install the Geocell + Why we used it
Why we used Geocell–
After researching the best way to do a paver patio with spaces between the pavers, I found that people had various ways of doing it.
Some people just stuck it straight on the dirt, others just laid it on gravel- but I didn’t really see anyone use paver sand or paver base system. Upon researching, I came across geocell, which is basically a stabilizing system for dirt, grass, gravel…whatever. Plus it provides superior drainage for steep slopes. What do I mean by a stabilizer?
You know when you walk on gravel in a pair of heels and completely sink… making it look like you’ve never put on a pair of heels in your life?! This product compacts the gravel so you can walk on it and even drive on it!
Geocell is typically used for driveways, walkways, and even in commercial uses – like steep slopes on the sides of the highway. And since I was debating between gravel or grass in between the pavers at the time, this seemed like the best idea!
Our plan was to use this geocell as a layer to lay our pavers on and then fill the rest with gravel or grass.
In hindsight, I don’t think we needed it, however it gave us a sturdy base to work off of and is perfect for how much rain we get. Not to mention a car can drive on it now! We’re looking forward to re-doing our driveway with this stuff next.
As for installing the geocell, it was super simple and quick.
Finally something easy!
After all the digging and packing of dirt, not to mention making sure it was level AF, we were ready for something that wasn’t back breaking.
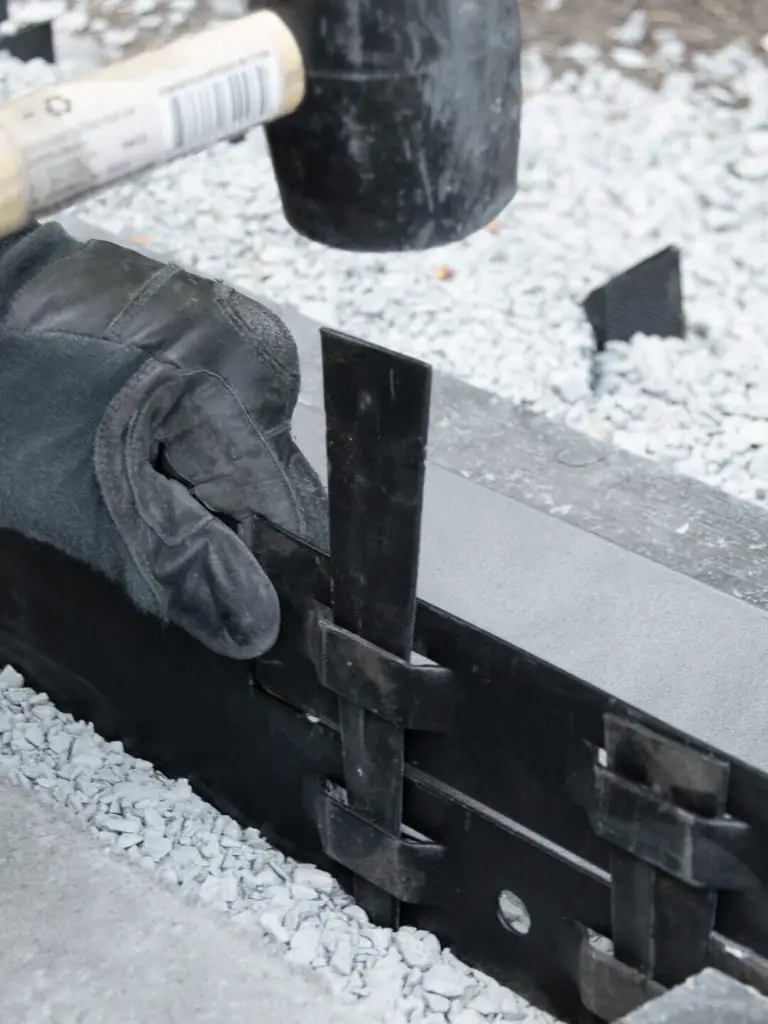
When the geocell arrived, it came in long strips that need to be stretched out- and this is definitely a two-person job! Once it was a little stretched out, we took a rubber mallet and a few landscaping steaks and secured it into the ground.
The geocell came with some fasteners that snapped two pieces of geocell together, so it made things really simple.
I have to admit, we actually forgot to lay the weed barrier down before we installed the Geocell the first time!
But in reality… this was a blessing in disguise. Let me explain…
Letting the geocell sit overnight all stretched out made it way easier to stretch out and install the next day. And it even went further than it originally did.
Long story short, If you have the time, pre-stretch the geocell overnight and then install it.


STEP 5
Fill The Geocell With Gravel
After the Geocell was in, we filled it with ⅝” minus and started packing it down with the tamper until it was full.
We had the gravel delivered by a local company, and if you can, have them back up right onto the geocell. That way you can just start spreading it around, instead of hauling it to the patio area one wheelbarrow at a time like we did.
Once the gravel was in and packed down, it was secure enough in some spots, where the steaks we hammered in were useless. So we ended up re-cooping some of them to use on another project!


STEP 6
Make Guidelines For The Pavers
Once the geocell was completely filled with rock and leveled out, we laid out our guidelines for the pavers.
Using our plan and measurements as a guide, we ran two strings perpendicular to one another, which gave us one corner of the patio – the perfect place to start.

STEP 7
Start Laying The Pavers
Once lined up one of the corners, we started laying the first paver, hammering it with a mallet and adjusting it until it was nice and flat.
The distance between the pavers in my drawings was 2.5”, so in order to make sure we maintained that all the way around, we found a piece of scrap wood that was conveniently 2.5”.
If yours ended up being a different size, you could screw a couple of pieces together and make it whatever size you need. This really help to speed up the process!
If we were to do this all over, I think we’d opt to use some paver sand, like a normal paver patio. I think it would have just help each paver sit nice and snug a little better. But even all said and done, our patio is really sturdy af, and the pavers don’t move a bit.
If you’re doing it like we did and just sitting it on top of the geocell and gravel, just beware that you might need to adjust it a bit, so each paver so it sits perfectly flat and flush with the paver next to it.
It just takes some patience….and a beer- definitely treat yourself to a beer! 🙂

STEP 8
Install The Edging Around The Patio
After all the pavers were in, we installed some black metal edging around the border as well as the inside to create a border for our modern feature fountain.
To install the edging, use a hacksaw or mini circular saw like we did, and cut it to size. Then fit the pieces together to create one continuous line or use a 90 degree elbow to create a square or rectangle and secure them in place with a rubber mallet and steaks.
Installing the edging took no time at all, and it added so much to the patio! Although, getting all the pieces needed for this was kind of a headache-
We had to go to 4 different Lowes on many occasions to find all the edging! I can’t tell you how many trips we took, but it was definitely over ten. Can you relate?!
But some things are worth the headache because I think this edging is one of my favorite parts!


Step 9
Add in dirt, mulch, & landscaping plants
After most of the edging was in, we filled in the sides with more dirt and started laying out some new plants and bushes.
I picked out some cherry laurels to create a tall border wall along our property line. Once they grow in, they’ll create a tall and dense privacy wall.
I also ended up planting some mexican grass on the backside, and few hydrangeas and rhododendrons to brighten it up.


STEP 10
Add Pea Gravel In Between The Pavers
Once everything was in place, the only thing left to do was add in the pea gravel in between the pavers! I just shoveled small amounts in between the pavers and used a broom to sweep them into place. I went back and forth whether we should use pea gravel, a decorative rock, or grass, but ultimately, I went with pea gravel. I didn’t want a bold rock in between the pavers, and long term, I think I would have maybe hated the upkeep of grass since there are so many pavers. So pea gravel it was. Plus, it was inexpensive and also helps to hide pine needles and other debris!

Phew, well there you have it! Exactly how we made our modern paver patio with pea gravel!
What do you guys think about our patio transformation? I honestly can’t get over the before and after. Dang- what did we even do with ourselves before this space?! It’s going to look even better once everything grows in, too!
We’re currently enjoying the rest of the summer with some patio furniture on it, but next year we plan on executing phase two of our design and making a raised garden area, so stay tuned!
Also, If you’re interested in all the details on how I made this modern feature fountain or freestanding trellis, I have blog posts for both.
I hope you found this blog post helpful and inspired you to transform a weird spot in your yard into something amazing!
Until next time,
Cheers!

It’s good to know that there is a way to use gravel and still make the ground stable enough while maintaining its heterogeneity. I might need a gravel hauling service soon in order to get a new driveway built in front of my house. Hopefully, that will make the front of my home look a lot more classical in design.
It’s such a great product, I’m sure you’ll love it. And yes, you’ll definitely need to get the gravel hauled in… it will take quite a bit.
Have you seen the exterior of Amber Lewis’s home? (founder of Amber Interiors) She has a beautiful gravel driveway that I’m always swooning over! It’s worth a look.
Great transformation!! Just out of interest, you mentioned you could have done this without the geocell, how would you have done this??? Just lay the paver on dirt and pea gravel around? Or lay paver on bed of crushed stone, then pea gravel round?
Thanks, May! If we didn’t use geocell, we could have done a layer of 3/8 minus and a layer of paving sand. (after the dirt was tampered) That’s the “traditional” way to do a paver patio where all the pavers are touching, so I assume it would also work for something like mine as long as there isn’t too much space between the pavers. Hope that helps!
Hello,
I have had a patio put together. It has salt and pepper gravel that is bigger than pea gravel and cannot be tamped down. I want to place two 24″x36″ together to sit adironack chairs on. I have 4 chairs. Can I just nestle them down into the gravel and make sure they are level. Will they crack?
In another part of our yard we nestled our 18” pavers directly in some pea gravel and it actually worked great. I would imagine since your pavers are quite a bit bigger it would work just fine- the weight of it will probably help it nestle in the gravel easier.
Hi! do you recall which pea gravel you used? I love the color of yours and am having a hard time finding something similar. Looks beautiful 🙂
Thanks, Steph! Funny enough, I can’t even find the exact same kind of pea gravel anymore. I originally purchased it from Lowes, but now they all look so different. I ordered a few bags of this: https://fave.co/3mzH78W . A few of the reviews say that the colors fades to a grey (which I’m hoping for). I haven’t used it yet, but will follow up and let you know!
Hi,
how did you go about figuring out how many pavers you needed taking into account the 2.5″ of space?
I am looking to do a 14×14′ patio area with larger pavers and a 4in gap..
Thank you
Hi Kenya, I mocked it up in Sketchup and CAD. Maybe try drawing it out on graph paper? It might take a little math to figure out. You could draw it so one box equals one inch. I hope this helps!
Thanks so much for sharing your process for creating a beautiful patio space. My husband and I are looking to do something similar in our yard but we are having trouble finding similar pea gravel. We are also in the Seattle area so can you share who you ordered yours through?
Thank you!
We actually got everything from Home Depot and Lowes! I know the exact pea gravel is a bit tricky to find these days- ours was from Lowes and came in bags. We’ve been to several stone yards looking for it again and haven’t been able to find an exact match. It’s so bizarre!
Love your patio ! Can you tell me where you purchased the Geocell ? Thank you! Jean
Thanks, Jean! We purchased ours from https://www.performancefooting.com although it looks like there are tons of places that sell it now. Ours is 3” tall.